Manual Cognito user registration approvals with Step Functions
1. Problem statement
Let’s say we have launched Awesome Application, a tool that stores documents for companies that subscribe to it. Multiple users from the same company can sign up and access shared company documents.
We’re using a Cognito user pool to manage users and issue tokens. The ID and access tokens from the user pool work with API Gateway, the entry point to Awesome Application, to authorize requests to endpoints.
Self-sign-up is enabled in Cognito. When new users register for Awesome Application, they provide:
- Their email address, which doubles as their username for logging in later.
- A strong password.
- The name of the company they work for.
After signing up, users log in with their email address and password. The company name is not used in user login.
But there is an issue.
With an automated sign-up process, users could enter any company name and pretend to be an employee of that company. This would give them access to sensitive documents from any company they choose.
To address this, we set these rules:
- Every user must be manually approved by an admin from their company. The admin verifies that the user works there.
- There’s no automatic sign-up allowed.
- Users must be added to their company’s Cognito group. When they log in, the tokens issued by the user pool will include the company name for authorization.
With these requirements in mind, let’s explore a possible solution.
2. Pre-requisites
This post will not cover the following:
- Setting up a user pool with an app client and Lambda triggers in Cognito.
- Creating IAM roles.
- Building Lambda functions and configuring API Gateway.
- Setting up SES to send emails.
- Creating a DynamoDB table and adding data.
- Designing a Step Functions state machine.
- Writing front-end code with React and Amplify.
I will include links to relevant documentation below for anyone who needs them.
Also, the solution here is not ready for production. It’s meant for learning purposes, showing an idea and some patterns.
3. Architecture
This architecture focuses on the sign-up workflow.

We use a single Cognito user pool to store users and their companies. Once a company admin approves a user registration, the workflow adds the user to the right Cognito group. If the admin rejects the request or the company name is invalid, the user’s directory status stays unconfirmed. Cognito blocks unconfirmed users from logging into the application.
The core of this setup is a Step Functions standard state machine that handles the manual approval step.
4. Digging deep
Let’s break down each part of the process.
4.1. User registration
Since self-sign-up is enabled, users can go to the Sign up page in Awesome Application and fill out the Create account form. They enter their email address, a password, and the name of the company they work for. To use the email as the username, we mark email as a Required attribute in the user pool.
If we want the company name in the tokens, we need a custom attribute in the user pool. Let’s call it company_name. This means the token will include a property called custom:company_name with the relevant value.
We also turn off Cognito’s automatic verification emails. With this feature enabled, Cognito sends new users an email to confirm their address, but we are handling approvals manually instead.
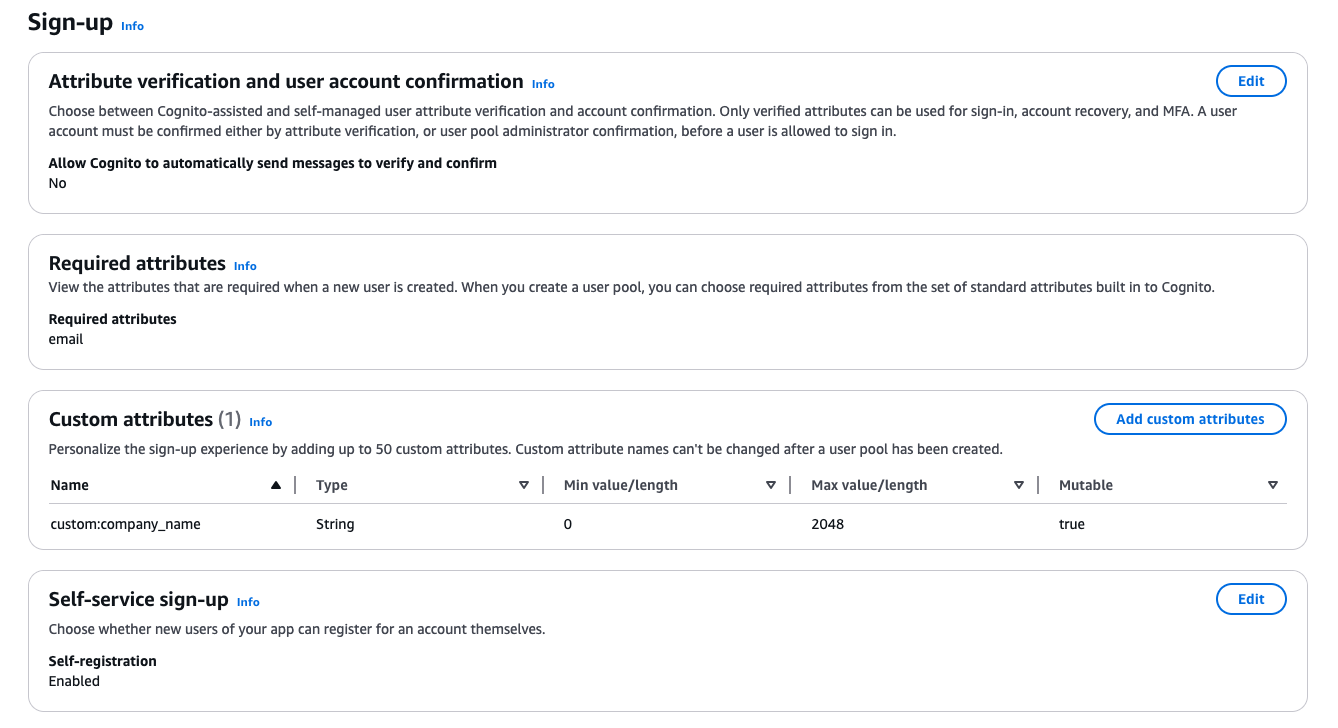
Unfortunately, Cognito does not allow us to make company_name a required attribute. We will need a workaround, like the one in this post, to handle that.

We set Email as the Cognito user pool sign-in option since users log in with their email addresses. Note that sign-in options and required attributes can’t be changed after we have created the user pool.
4.2. Using Amplify
Amplify’s built-in UI and login features don’t support our custom company_name field in the sign-up form, so we have to build the form ourselves.
That said, we can still use Amplify. It offers methods for sign-up, sign-in, and sign-out that handle Cognito API calls behind the scenes.
Here is part of a possible SignUp React component’s handleSignUp function, triggered when the user submits the form:
import { signUp } from "aws-amplify/auth";
// Other imports

// SignUp React component
function SignUp() {
  // ... set states here

  const handleSignUp = async (event) => {
    // Omitted for brevity
    await signUp({
      username: email, // Use email as the username
      password,
      options: {
        userAttributes: {
          email,
          "custom:company_name": companyName, // Our custom attribute
        },
      }
    });
  }

  // Create the form here
}

export default SignUp;
There are similar methods for sign-in and sign-out flows.
4.3. Pre-sign-up Lambda trigger
When the user submits the form, Amplify’s signUp method adds them to the Cognito user pool with an Unconfirmed status.
At this point, Cognito can trigger a pre-sign-up Lambda function. We use it to start the Step Functions workflow:
import { SFNClient, StartExecutionCommand } from "@aws-sdk/client-sfn";

const sfnClient = new SFNClient();

const { STATE_MACHINE_ARN } = process.env;

export const handler = async (event) => {
  const {
    userName, // This is the sub from the user pool
    userPoolId,
    request: {
      userAttributes: {
        "custom:company_name": companyName,
        email
      }
    }
  } = event;

  const stateMachineInput = {
    userName,
    companyName,
    email,
    userPoolId
  };

  const startExecutionCommand = new StartExecutionCommand({
    stateMachineArn: STATE_MACHINE_ARN,
    input: JSON.stringify(stateMachineInput),
    name: `NewUserRegistration-${userName}-${Date.now()}`
  });

  try {
    // Start the state machine execution asynchronously
    await sfnClient.send(startExecutionCommand);

    // Return the event object to allow sign-up to proceed
    // The user stays unconfirmed until approved
    return event;
  } catch (error) {
    throw error;
  }
};
The event object has everything we need to start the state machine and looks like this:
{
    "region": "eu-central-1",
    "userPoolId": "USER_POOL_ID",
    "userName": "029f515c-97db-4e3f-8905-f7b5b82db993", // Cognito user name (sub)
    "triggerSource": "PreSignUp_SignUp",
    "request": {
        "userAttributes": {
            "custom:company_name": "MyCompany",
            "email": "john.doe@mycompany.com"
        }
    }
    // ...other properties here
}
4.4. The state machine
The state machine uses JSONata syntax to manage variables and state inputs/outputs.

The StoreVariables state sets up variables that are available for each state in the workflow:
{
  "userName": "{% $states.input.userName %}",
  "companyName": "{% $states.input.companyName %}",
  "userPoolId": "{% $states.input.userPoolId %}",
  "userEmail": "{% $states.input.email %}"
}
This keeps us from passing these variables through every state, unlike with JSONPath.
Here are the main workflow steps.
4.4.a
The GetAdminsForCompany Lambda function queries a DynamoDB table that lists admins who can approve or deny registration requests for a company. A company might have multiple admins. In this case, all of them get the approval email.
The HasAdmin Choice state checks if there are admin emails for the company provided.
If there are none, say, because the user entered an invalid company name, the workflow deletes the user from the user pool using the AdminDeleteUser Cognito API. It also sends the user an email via SES saying the registration failed.
4.4.b
If GetAdminsForCompany finds admin emails, Step Functions calls the SendApprovalEmail function. Here is what that might look like:
import { SESClient, SendEmailCommand } from "@aws-sdk/client-ses";

const sesClient = new SESClient();

const { API_ENDPOINT, FROM_EMAIL } = process.env;

export const handler = async (event) => {
  const {
    userName,
    userPoolId,
    userEmail: email,
    adminEmails,
    executionContext
  } = event;
  const taskToken = executionContext.Task.Token;

  // Create approve/deny URLs
  const approveUrl = `${API_ENDPOINT}/confirm-registration?action=approve&token=${encodeURIComponent(taskToken)}`;
  const denyUrl = `${API_ENDPOINT}/confirm-registration?action=deny&token=${encodeURIComponent(taskToken)}`;

  const textBody = `
    New User Registration Requires Approval

    User Details:
    Username: ${userName}
    User Pool ID: ${userPoolId}
    Email: ${email}

    Actions:
    To approve: ${approveUrl}
    To deny: ${denyUrl}
  `;

  // Send email using SES
  const emailParams = {
    Destination: {
      ToAddresses: adminEmails,
    },
    Message: {
      Body: {
        Text: {
          Charset: "UTF-8",
          Data: textBody
        }
      },
      Subject: {
        Charset: "UTF-8",
        Data: `New User Registration - ${userName}`
      }
    },
    Source: FROM_EMAIL
  };

  const sendEmailCommand = new SendEmailCommand(emailParams);

  try {
    await sesClient.send(sendEmailCommand);
  } catch (error) {
    console.error("Error sending approval email:", error);
    throw error;
  }
};
The function’s event input looks like this:
{
  // From the previous state
  "adminEmails": "{% $states.input.adminEmails %}",
  // Variables from StoreVariables
  "userName": "{% $userName %}",
  "userPoolId": "{% $userPoolId %}",
  "userEmail": "{% $userEmail %}",
  // From the state’s context
  "executionContext": "{% $states.context %}"
}
This state handles the manual approval. We use Step Functions’ Wait for callback feature in this Task state, which adds a task token to the execution context.
The function builds approve and deny URLs with the task token, then sends an email to the admins via SES with those links.
4.4.c
The URLs point to an API Gateway endpoint backed by a Lambda function.
The SendApprovalEmail function included the task token in the URLs as a query parameter. The backend Lambda extracts it - along with the action parameter (approve or deny) - from the API Gateway event:
export const handler = async (event) => {
  const action = event.queryStringParameters.action;
  const taskToken = event.queryStringParameters.token;

  const message = action === "approve"
    ? { "Status": "Approved" }
    : { "Status": "Denied" };

  const input = {
    output: JSON.stringify(message),
    taskToken,
  };

  try {
    await sfnClient.send(new SendTaskSuccessCommand(input));
    return {
      statusCode: 200,
      body: JSON.stringify({ message: "Success!" }),
    };
  } catch (error) {
    throw error;
  }
};
Here is a key step: the function calls Step Functions’ SendTaskSuccess API with the task token and an output field. That output becomes the input for the next state - here, it’s just Approved or Denied. When Step Functions gets the task token, the workflow execution will resume.
4.5. Manual approval
The admin approves or denies the request by clicking the appropriate link in the email.
4.6. Approved or denied?
If the admin approves, Step Functions calls the AdminConfirmSignUp Cognito API to confirm the user, changing their status to Confirmed.
If the admin denies, this example uses a simple Pass state. You could replace it with a state to delete the user with AdminDeleteUser, as we did earlier, and notify them.
4.7. Post-confirmation Lambda trigger
Once the user is Confirmed, Cognito can trigger a post-confirmation Lambda function. This adds the user to their company’s group in the user pool:
import { CognitoIdentityProviderClient, AdminAddUserToGroupCommand } from "@aws-sdk/client-cognito-identity-provider";

const cognitoClient = new CognitoIdentityProviderClient();

export const handler = async (event) => {
  const userPoolId = event.userPoolId;
  const username = event.userName;
  const companyName = event.request.userAttributes["custom:company_name"];

  const command = new AdminAddUserToGroupCommand({
    UserPoolId: userPoolId,
    Username: username,
    GroupName: companyName,
  });

  try {
    await cognitoClient.send(command);
  } catch (error) {
    console.error("Error adding user to group:", error);
    // Retry or send a notification
  }

  return event;
};
That’s it! Next time the user logs in with their email and password, their tokens will include custom:company_name, ready for authorization.
5. Considerations
This solution doesn’t cover every detail of a production-ready system. Here are some things to keep in mind.
5.1. Permissions
Ensure the Step Functions state machine and Lambda functions have the right permissions for Cognito, DynamoDB, and SES.
5.2. Admin items and groups
This solution assumes admin emails and company groups already exist in DynamoDB and Cognito. Setting those up could be a separate process, maybe with API Gateway and Lambda endpoints for admins to add them before users sign up.
5.3. Error handling and retries
To keep things concise, I skipped error handling. In practice, you would need to add error checks and retries in the code, use Step Functions for retries, or send alerts via SNS, depending on your needs.
5.4. Company name spelling
Users might misspell their company name during sign-up. If so, the workflow rejects them because the input won’t match the corresponding items in the database.
You could leave it as is or add something like a type-ahead search to help.
5.5. Manual addition
Alternatively, admins could manually add users to Cognito and their company group via admin endpoints. Users would get a username and temporary password, which they would change on the first login. Tokens would still include company info, but you would skip the Step Functions workflow entirely.
This simpler approach cuts automation but might make sense if time is tight or explaining Step Functions to new developers feels tricky. I would still go with the workflow, though.
6. Summary
When users from the same company need access to shared documents in our app, automatic sign-ups might not be the best fit.
Instead, we can use Step Functions and Cognito Lambda triggers to build a workflow that includes manual approval for new users.
7. Further reading
Getting started with user pools - How to create a user pool with an app client
IAM role creation - How to create IAM roles
Create your first Lambda function - How to create Lambda functions
Set up your SES account - Using the SES Wizard to quickly set up the account
Set up email sending with Amazon SES - Different ways of sending emails with SES
Getting started with DynamoDB - DynamoDB basics
Learn how to get started with Step Functions - Step Functions tutorial
Authentication - Use Amplify with Cognito for authentication