Protecting Application Load Balancers with private integrations
1. A use case
Alice’s company has a microservice architecture for their awesome application. They use ECS container instances with the current shiny superstar-on-duty Node.js framework. An Application Load Balancer distributes the incoming traffic to the Fargate instances.
Alice decided to place an API Gateway before the load balancer because she wants to implement an easy but secure authorization method.
2. The problem
Alice’s problem is that the load balancer is internet-facing. If someone gets the DNS name of the load balancer, they can invoke it and get a successful response.
In their existing architecture, Alice should choose an authorization technique on the load balancer or the server itself. If the team comes up with a not-so-hard-to-guess custom domain name for the backend (for example, api.example.com), the service will be in trouble in case of a DoS attack.
That’s why she decided to remove authorization from the ALB and provisioned an HTTP API using an API Gateway.
But the API Gateway itself won’t isolate the load balancer because it is still internet-facing.
3. A solution
We can create a private integration for the API endpoint(s).
Instead of an internet-facing load balancer, we provision an internal ALB with an HTTPS listener. We will create a VPC Link in the API Gateway, which functions as a secure tunnel for the traffic between the gateway and the load balancer. The traffic won’t leave the AWS network.
We place the internal load balancer in a private subnet whose default route is not pointing to the Internet Gateway. The ALB doesn’t have a public IP address either. The API Gateway and the load balancer will communicate via their private IP addresses.
When we try to call the DNS name of an internal load balancer, the request will time out. It is because the DNS name now belongs to a private IP address, which is invisible from the internet.
The only way to send traffic to the load balancer (and their targets) is via the API Gateway, which we can secure.
4. Steps
The steps below will show how to create a private integration for an HTTP API. REST APIs have a different (and more complex) mechanism to set up the same architecture.
HTTP APIs are cheaper, faster, and more suitable for serverless architectures. On the other hand, though, REST APIs are more configurable than HTTP APIs.
I will attach a link to the differences between REST and HTTP APIs, which you can find at the end of this post.
4.1. Pre-requisites
This post won’t explain:
- How to create an HTTP API.
- How to create an internal Application Load Balancer with an HTTPS listener and a certificate attached.
- How to create a hosted zone in Route 53 with your domain.
The steps below will assume that these resources already exist.
I’ll provide some links at the end of the post that will help spin up these resources if needed.
4.2. Create a custom domain - optional
It’s always nice to call an API with a custom domain.
The base URL for APIs generated by API Gateway looks like this:
https://{api_id}.execute-api.{region}.amazonaws.com/{stage_name}/
If you are happy with the current format of the endpoint URL, then feel free to skip to the next section.
A custom domain makes it possible to call the endpoint with an application-compliant name.

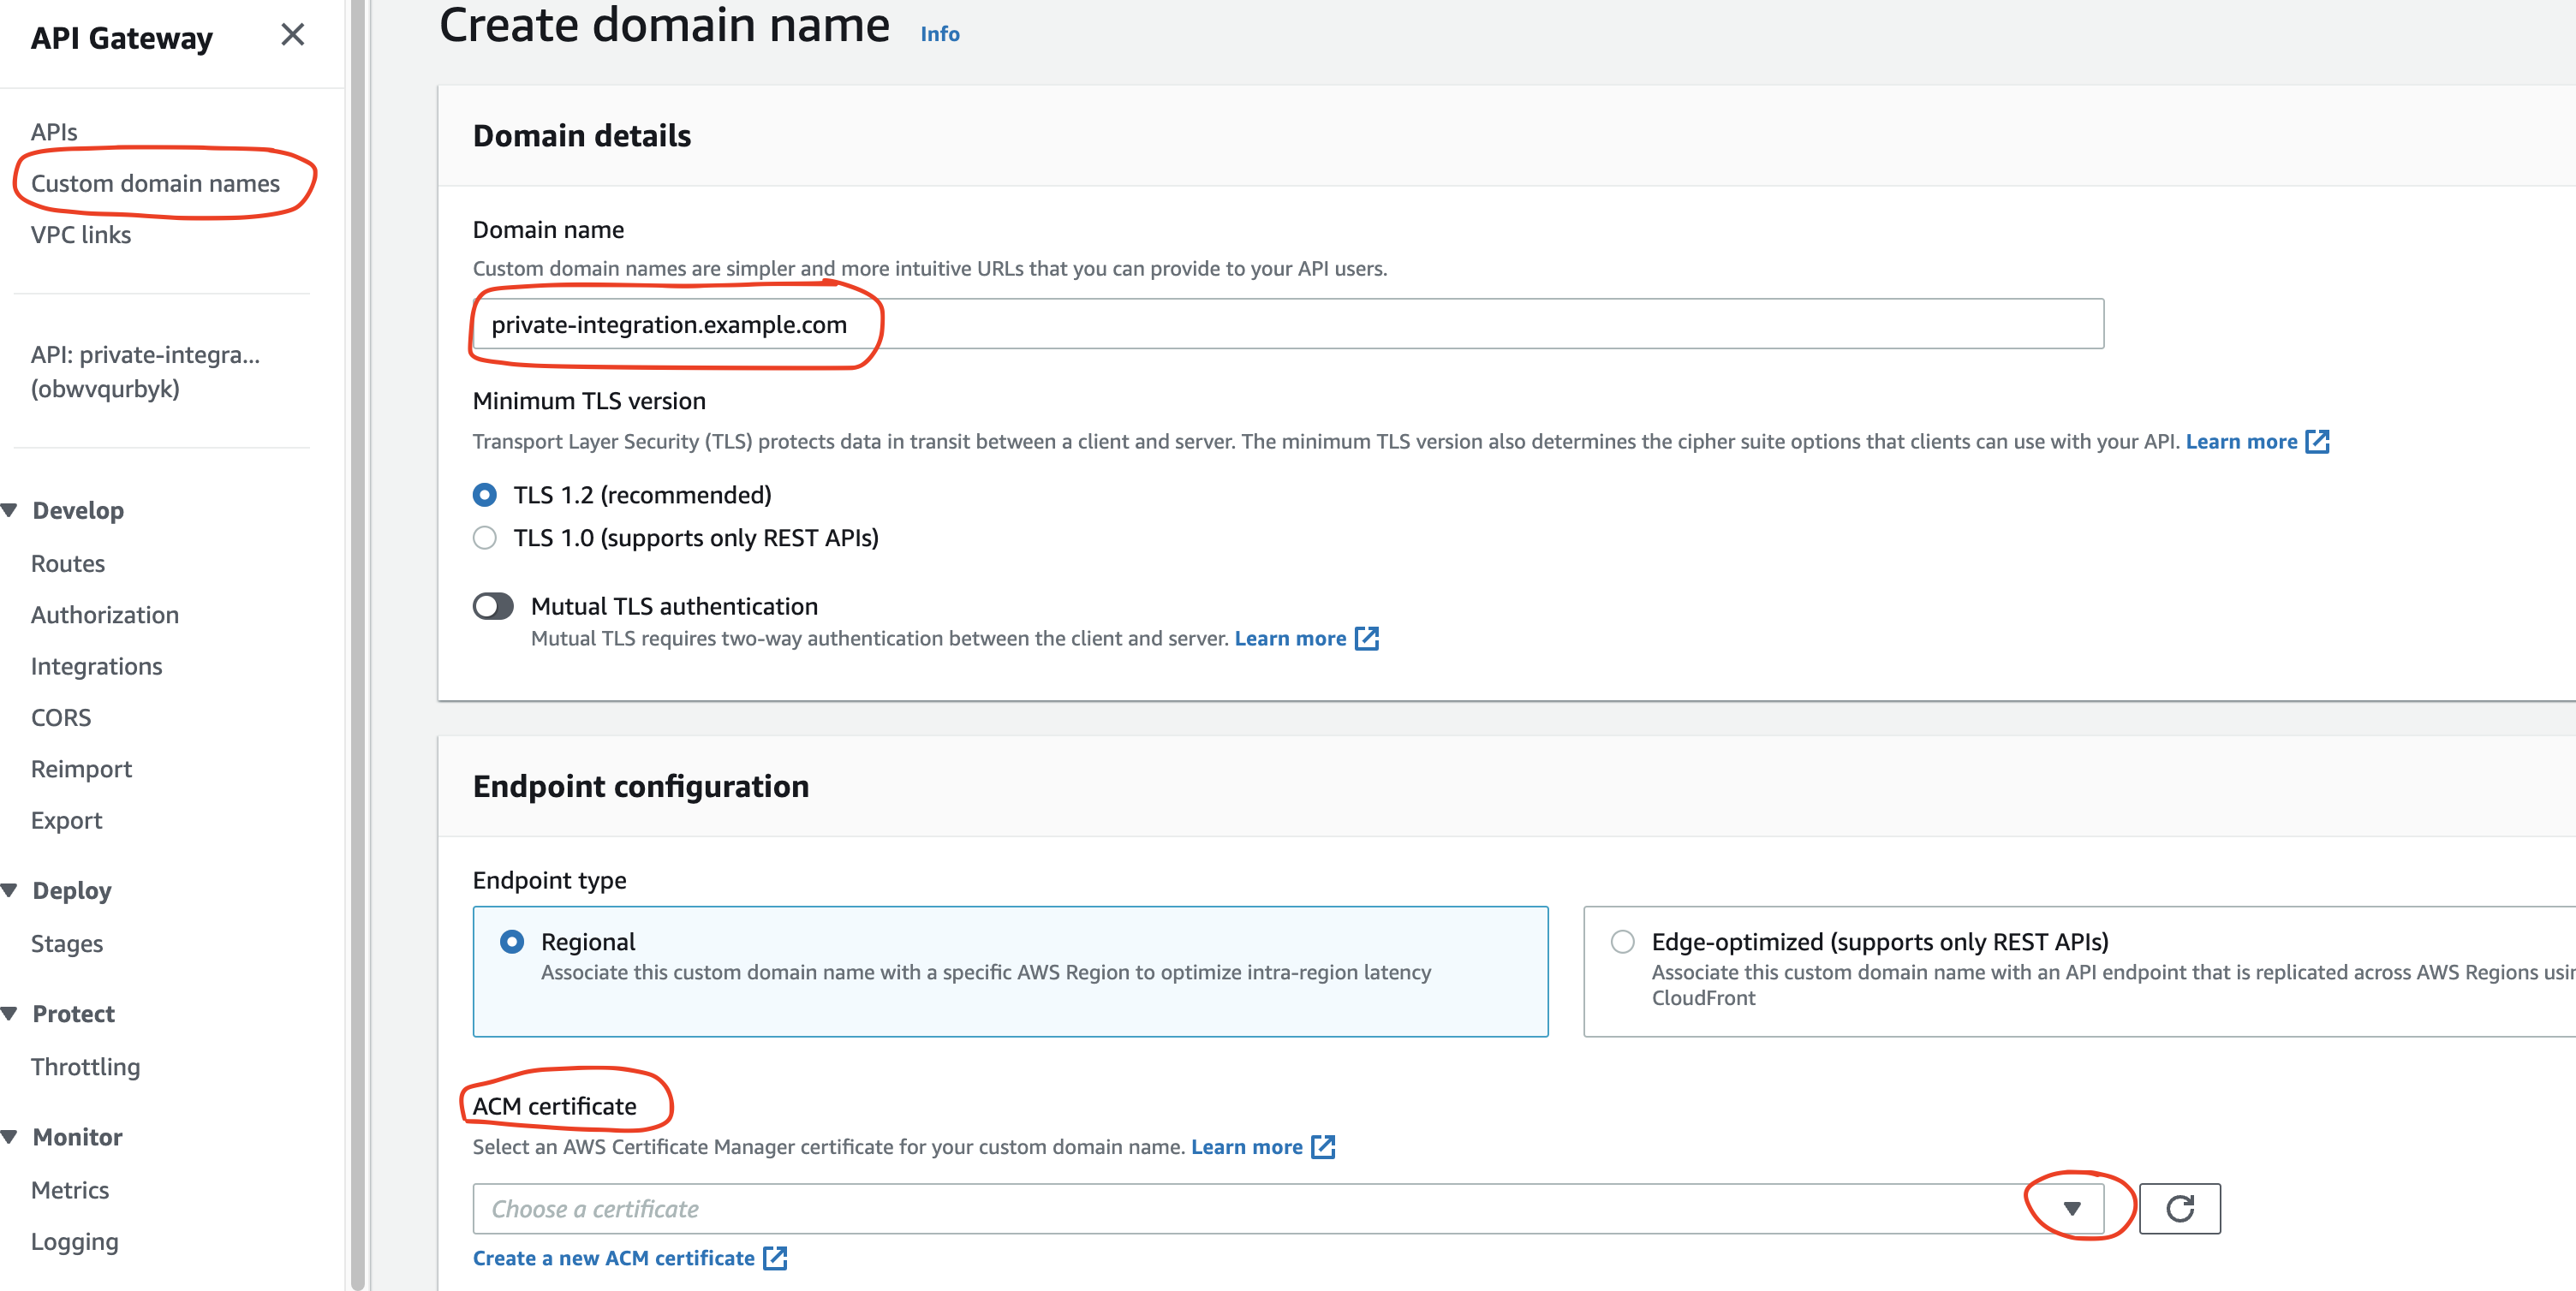
In this case, the domain is called example.com, and the subdomain for the API is private-integration.example.com.
We have to provide a certificate for the subdomain. We can generate one for free using the AWS Certificate Manager (ACM) service.
It’s essential to choose the same region as the API’s location in ACM and include all subdomains in the certificate. The *.example.com format will work.
One more important thing here is to map paths from the custom domain to the API stages. In this example, there is no need to map anything specific.

Going to the API mappings tab, we select the API and the stage. We can leave out the path part because we haven’t defined any paths.
4.3. Create a record in Route 53
Next we should generate an alias A record in Route 53 that points to the API Gateway domain name (and not the invoke URL!).
We can find the API domain name in the Endpoint configuration section after we have created the custom domain name (see the previous point).
4.4. Create a VPC link
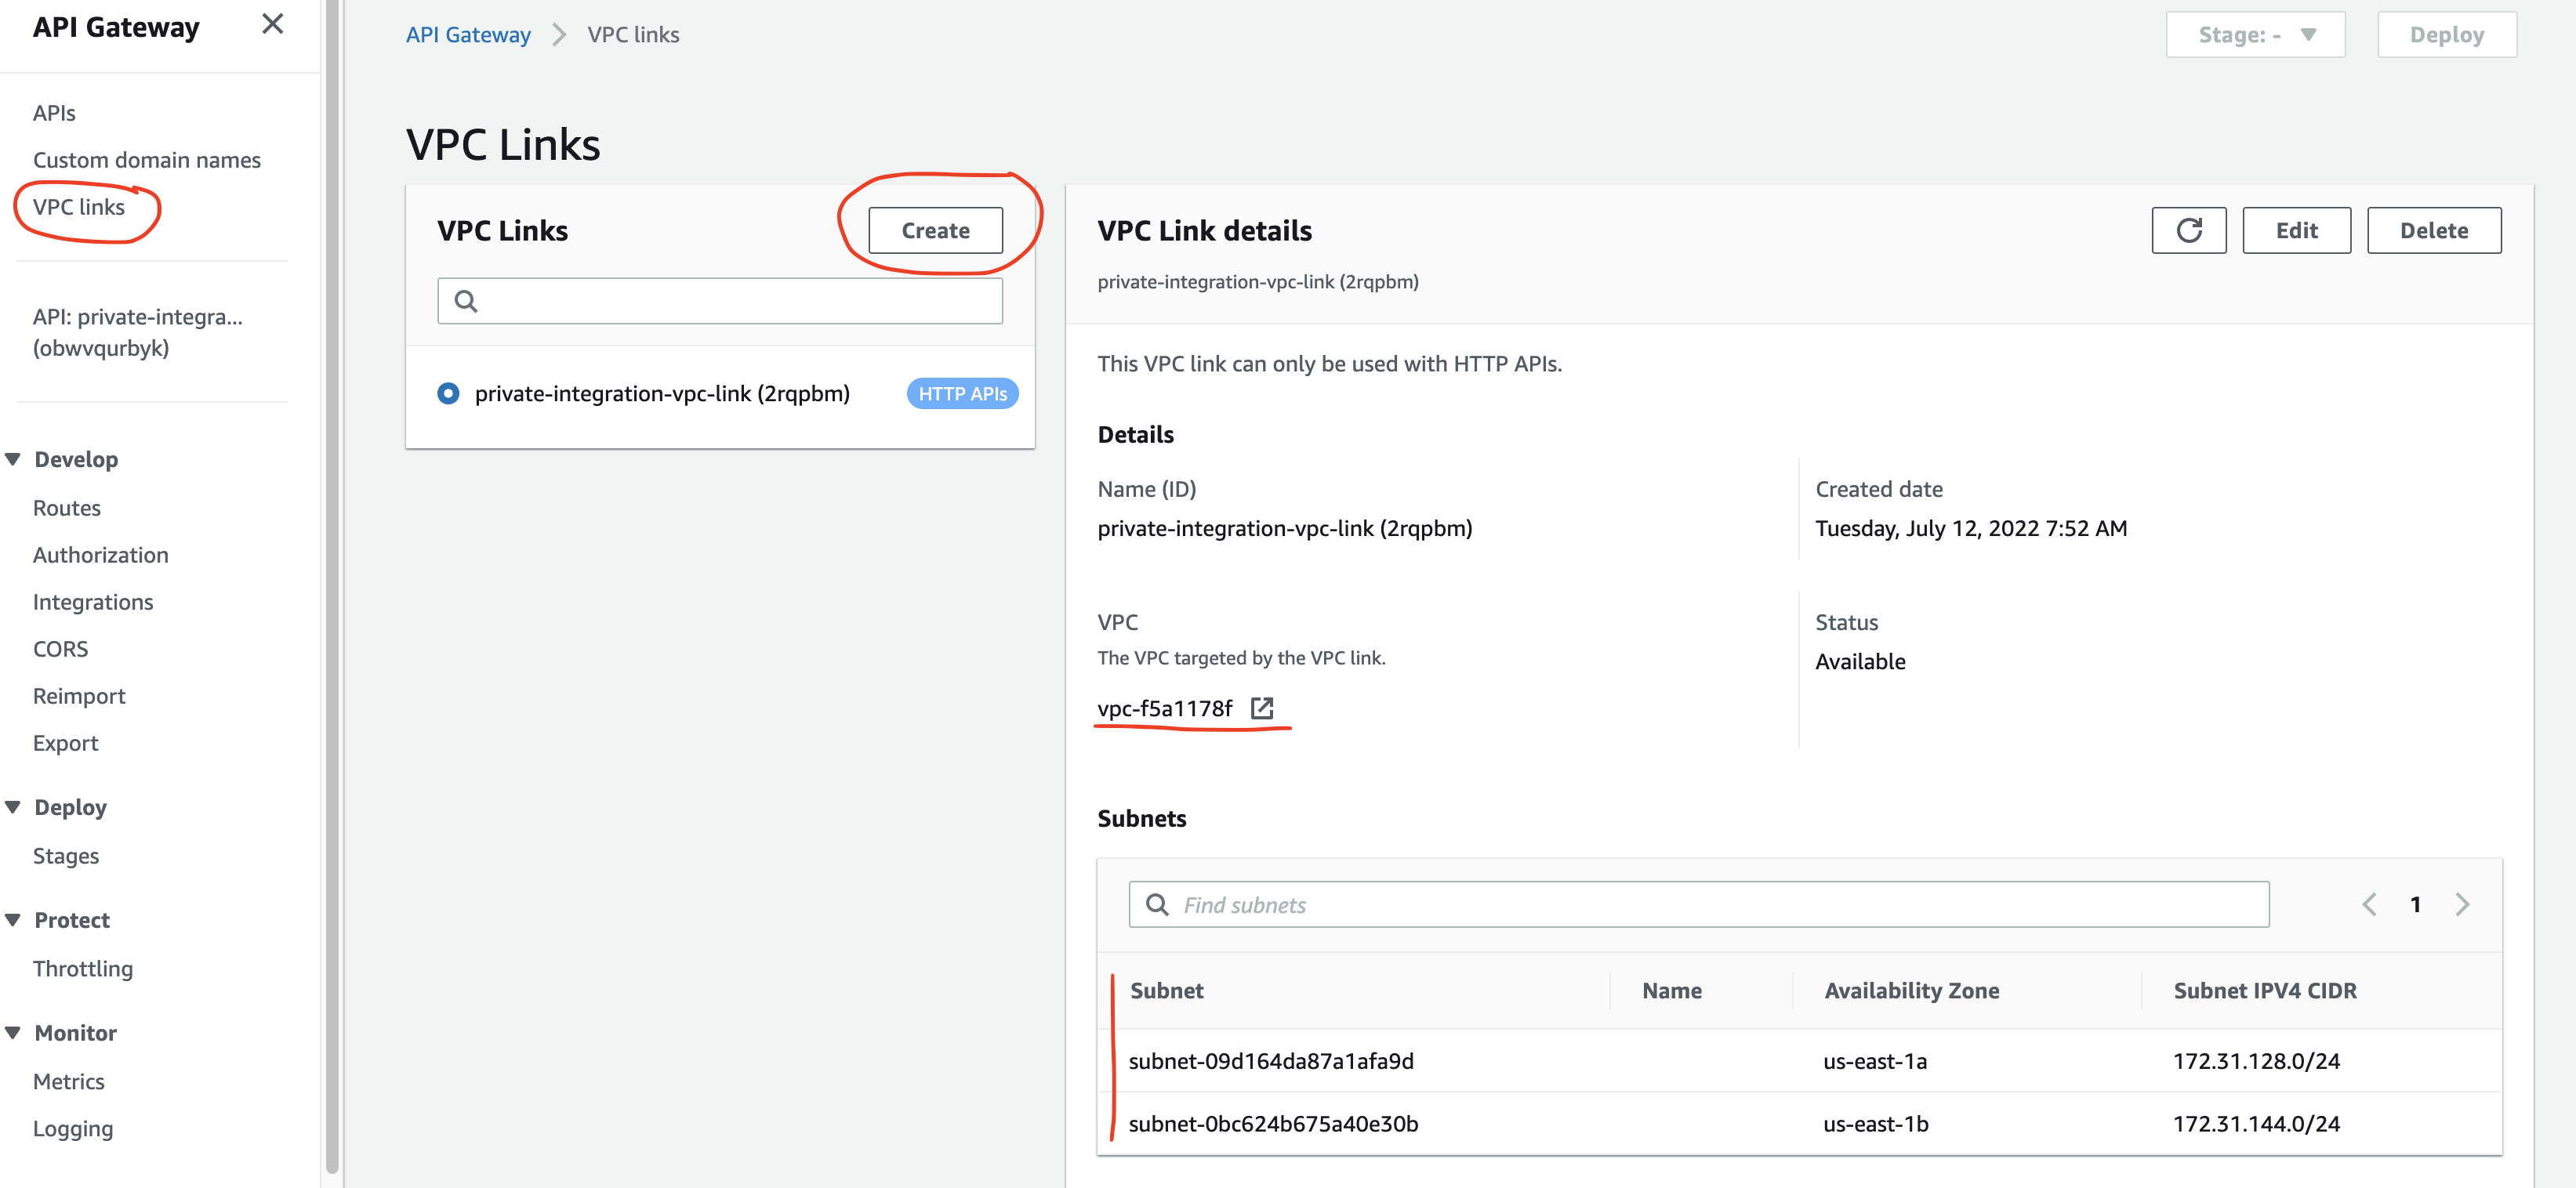
A VPC link is an API Gateway resource that connects API endpoints to private resources. Because we provisioned the internal load balancer in a private subnet in a VPC, we will need a secure way to connect the API to the ALB.
VPC links serve this purpose. They act as a tunnel between API Gateway’s (AWS-managed) VPC and our VPC, where we have provisioned the ALB.
Let’s then create a VPC link!

In the VPC links section in API Gateway, click Create. We should give the VPC link a name, choose the VPC and subnets where we had provisioned the internal load balancer (they should be private subnets). Because AWS will generate an elastic network interface (ENI), we will have to specify a security group too. A basic security group will work since we don’t need to specify any ports and IP addresses.
Creating the VPC link will take a few minutes because AWS provisions the ENIs.
4.5. Create the private integration
We are now ready to connect the API to the load balancer!
First, create a Route in API Gateway if needed.
Then, in the Integrations menu we will Create an integration in the Manage integrations tab.

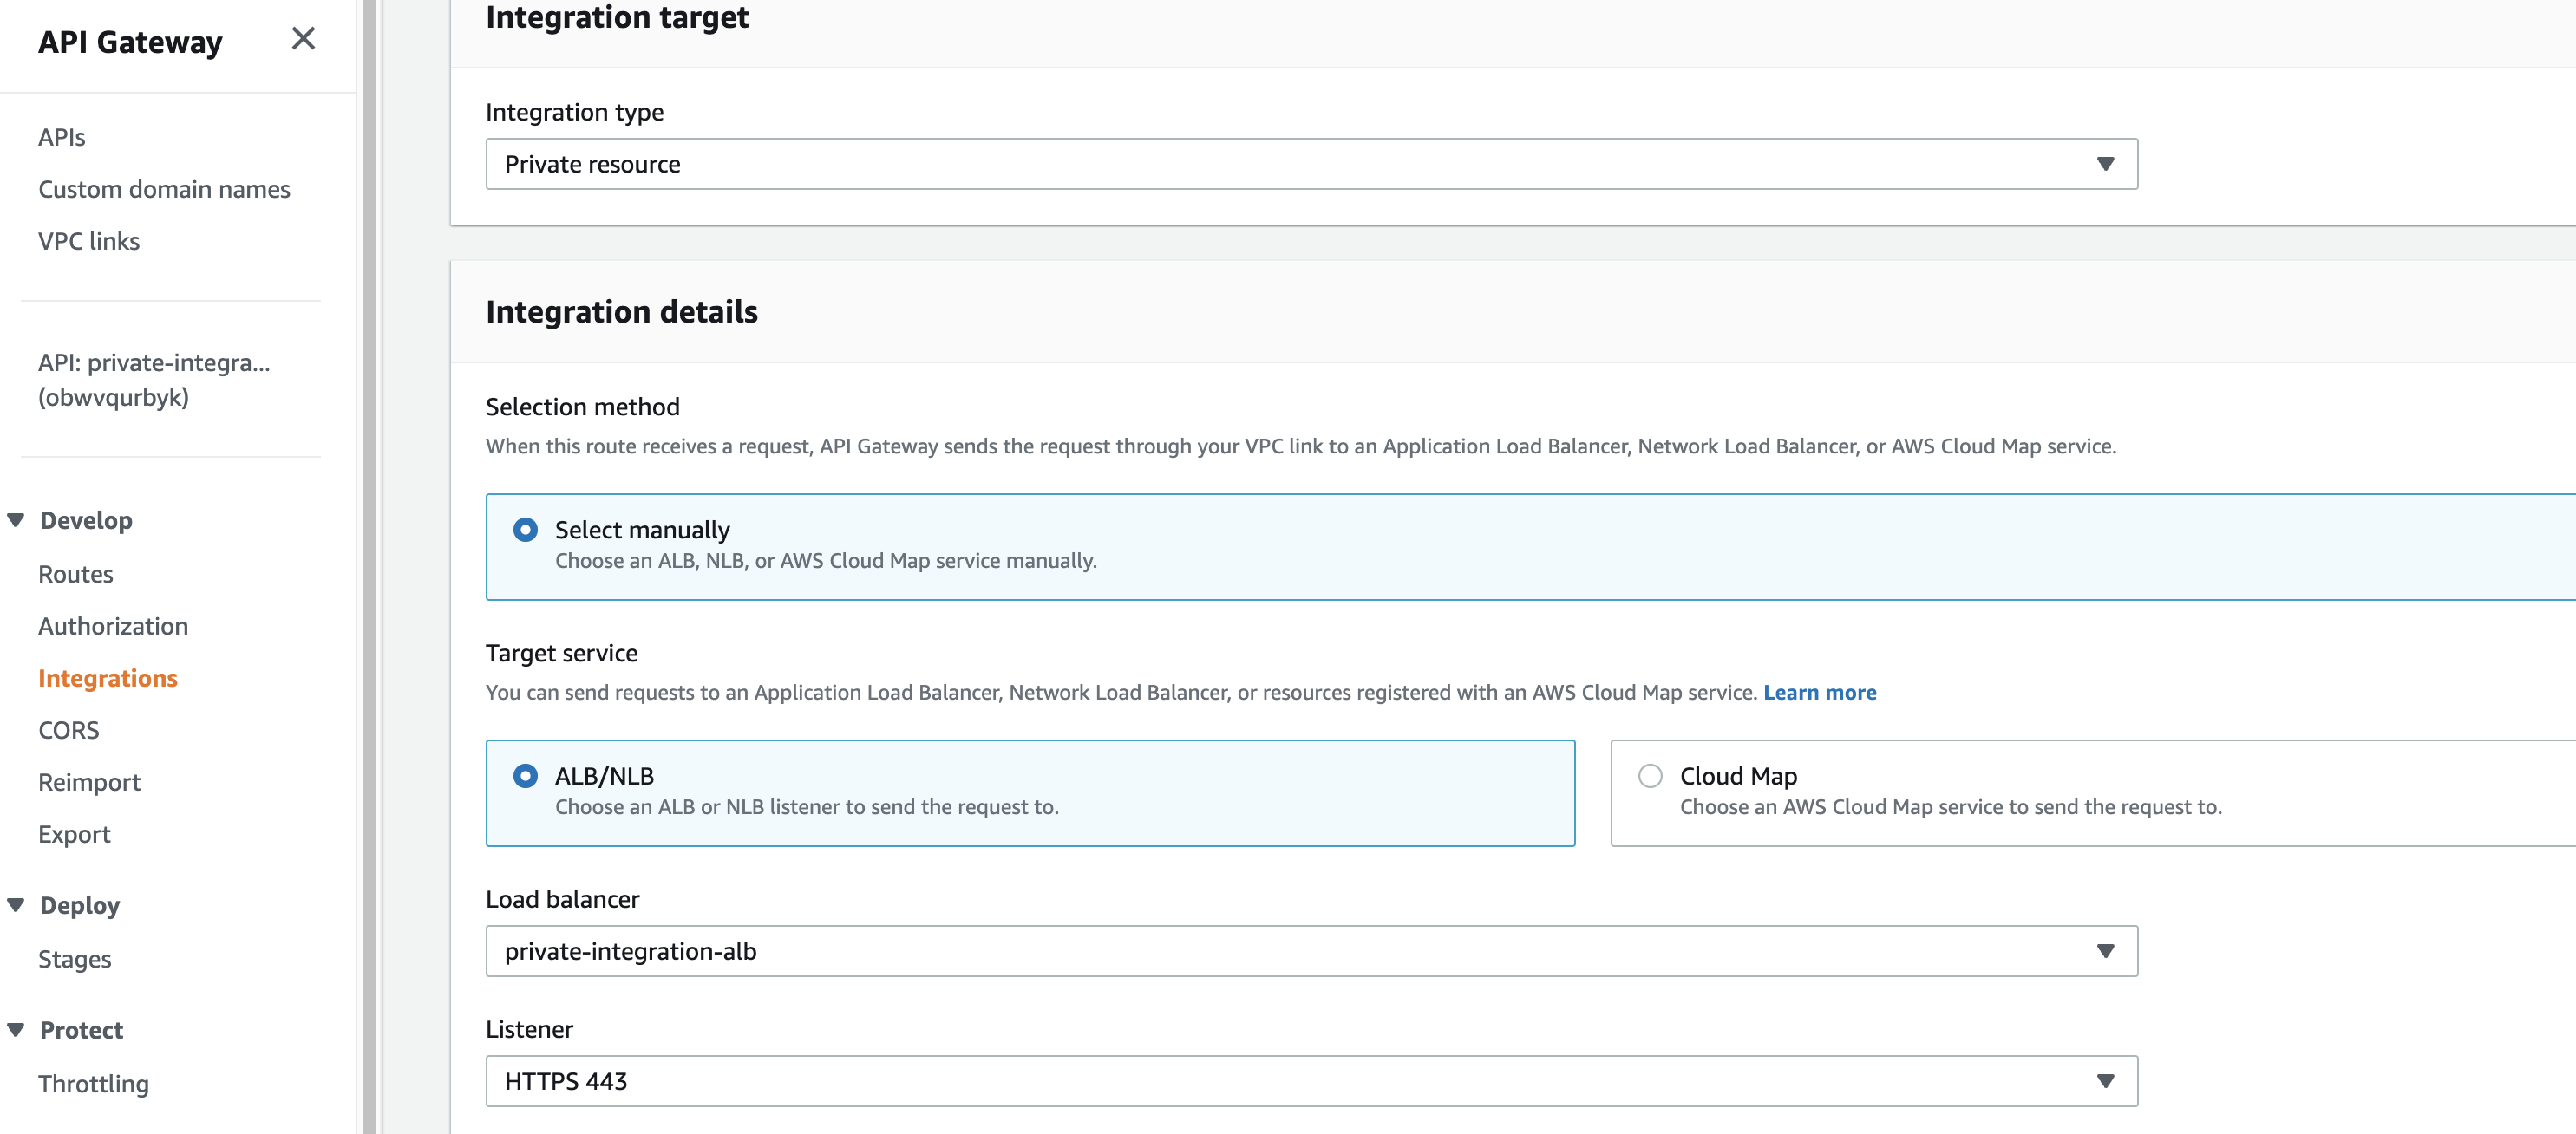
After we have selected the route, we should choose the Private resource integration type! Normally we connect an Application Load Balancer to API Gateway via HTTP integration. But because our internal load balancer qualifies as a private resource, we will have to select the corresponding integration type.

The next step is to select the load balancer and the HTTPS listener.
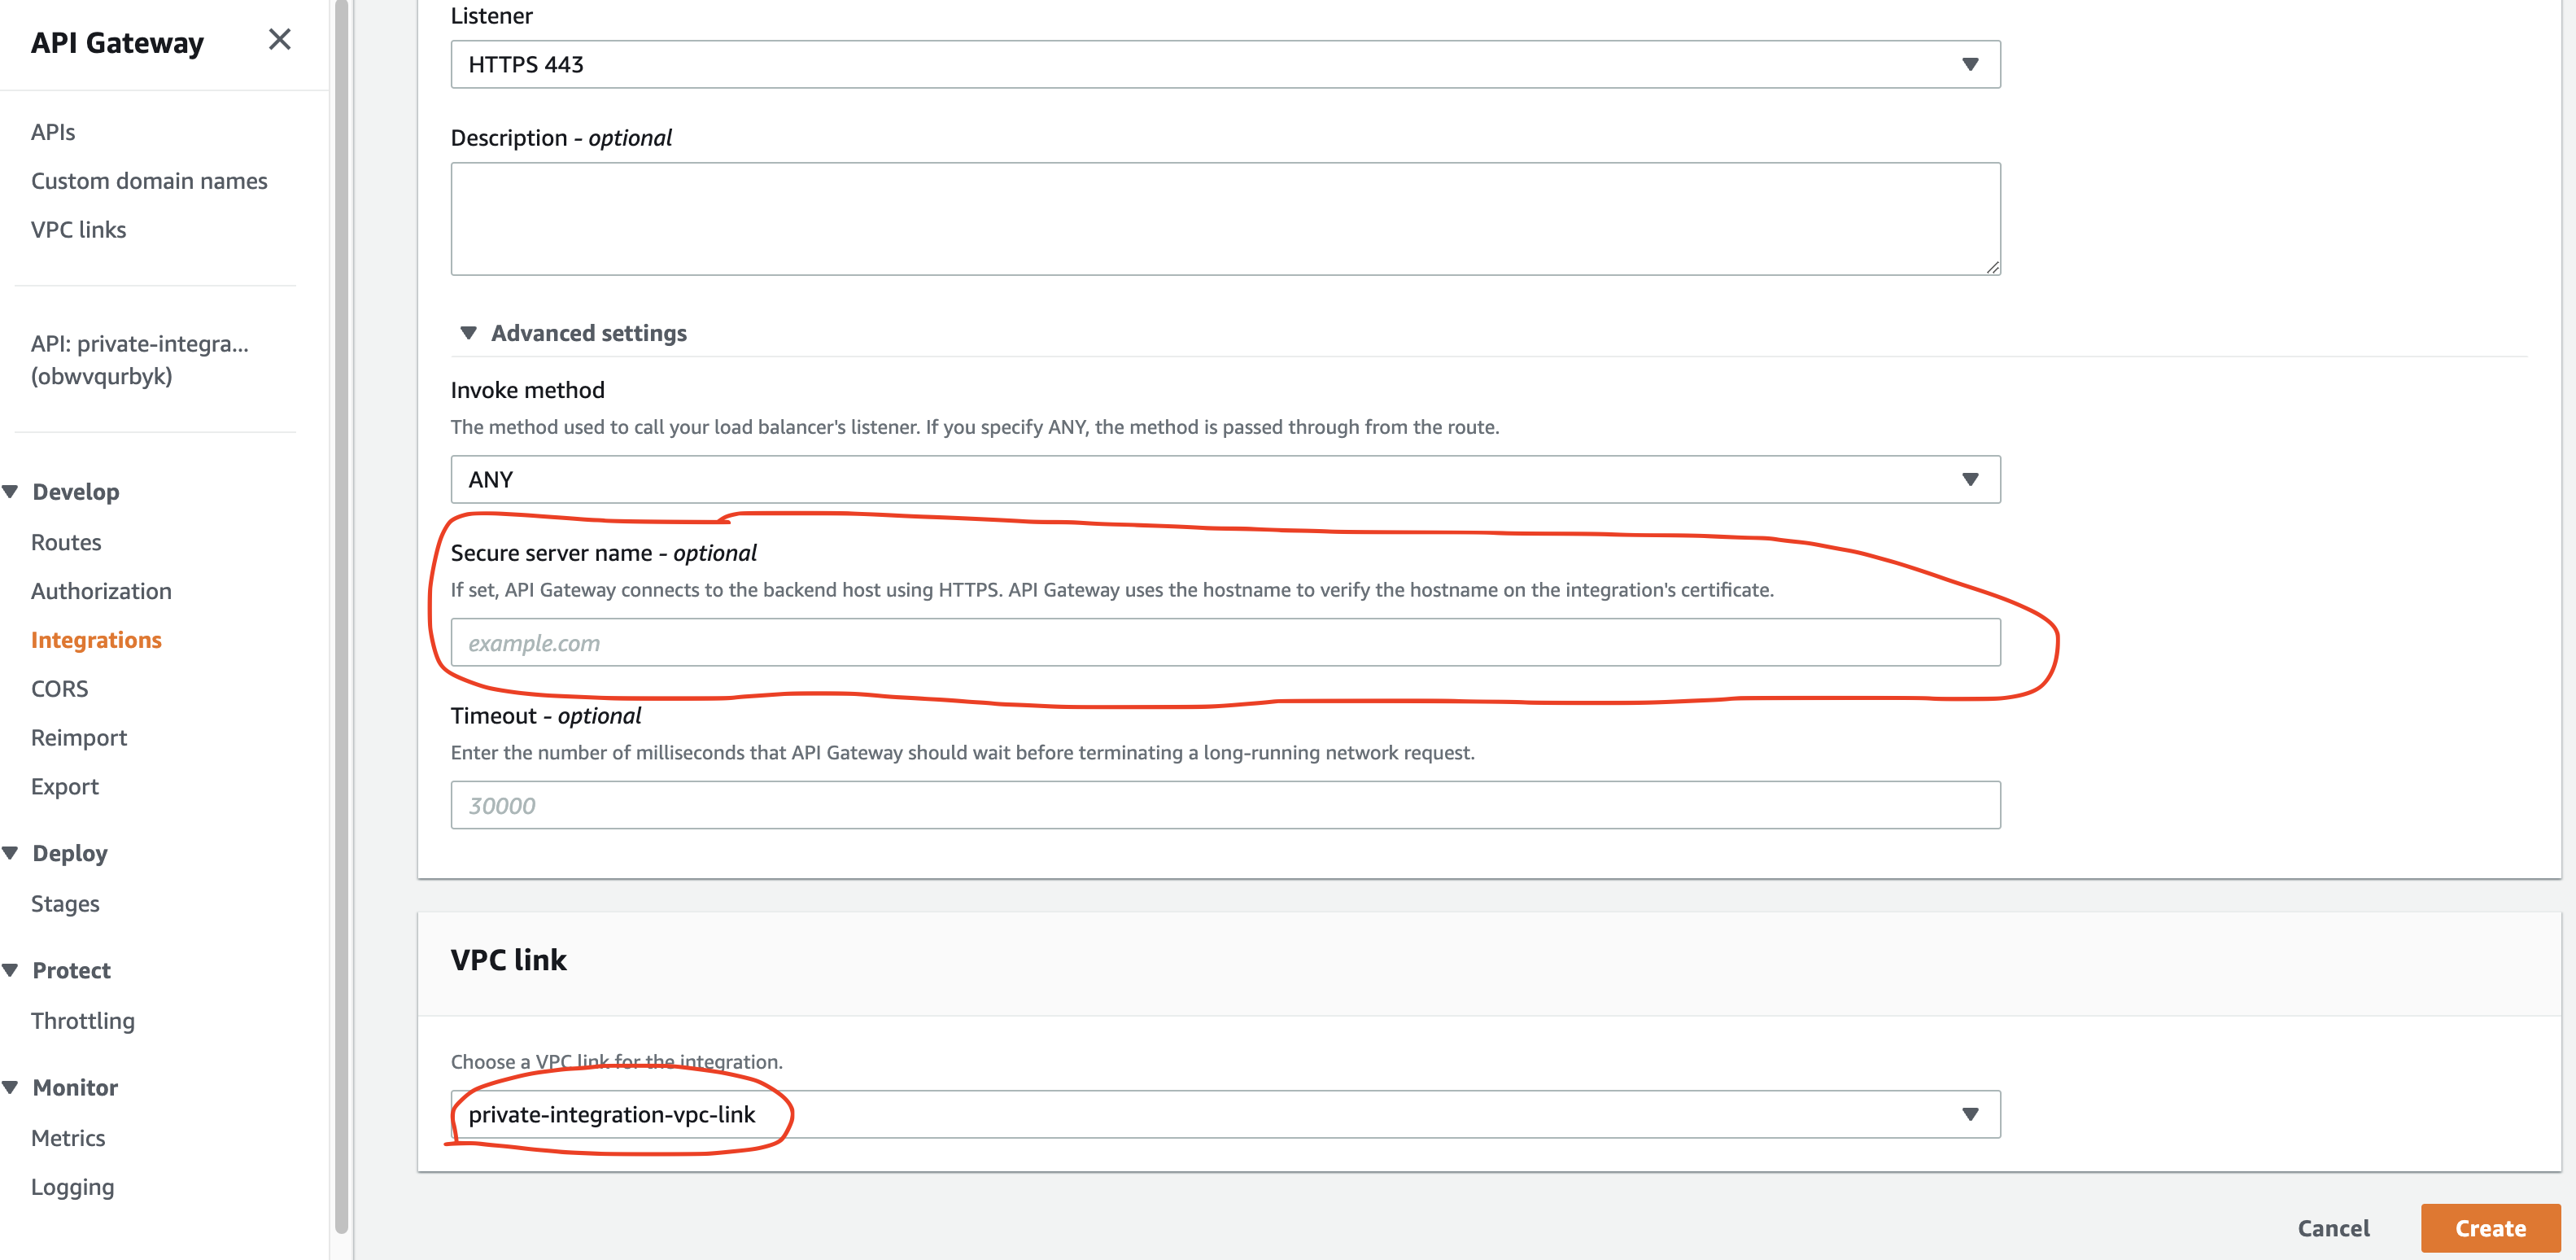
By default, the API Gateway will connect to the load balancer on port 80 though we can choose TLS if we want to encrypt traffic in transit. For the traffic to use the HTTPS protocol, we should specify the HTTPS hostname.

In the Advanced settings part, we put private-integration.example.com, the custom domain name we had created above.
We also select the already created VPC link.
4.6. It should work now
We can now test the endpoint. The call to the https://private-integration.example.com/<YOUR_ROUTE> should work, and we should see the response that the load balancer target returns. We managed to protect our load balancer because it’s invisible from the internet.
We can add authorization to the endpoint because it’s recommended not to leave the API unprotected.
5. Summary
We can hide the Application Load Balancer if we set it up in a private subnet. Then we will place an API Gateway in front of the ALB and create a private integration to the load balancer.
We will need a VPC link that connects the API to the internal load balancer in the VPC.
6. References and further reading
Choosing between REST APIs and HTTP APIs - Comparison with lots of tables
Creating an HTTP API - How to create an HTTP API in API Gateway
Create an Application Load Balancer - How to create an Application Load Balancer
Create a public hosted zone - How to create a hosted zone in Route 53
Understanding VPC links in Amazon API Gateway private integrations - Great article on how VPC links work