Controlling access in service-to-service communications with Cognito - Part 1
1. The scenario
Bob’s engineering team is in the middle of splitting up their monolith service into microservices. Each microservice exposes an API, and Bob must figure out how to control access when one service calls another.
Bob decided to follow the OAuth 2.0 standards and he will use access tokens for authorization.
2. The solution
Bob’s solution starts with Amazon Cognito, which will generate the access tokens. The service that wants to access the other microservice will call Cognito and receive the token in the response (covered in this post).
Next the service will make a request to the API of the other service with the token placed in the Authorization header.
The API Gateway in the called service will decode the token and verify if it contains the necessary permissions called scopes. If the scope in the token matches one of the required permissions Bob defined in the API Gateway authorizer, the request will continue to the back-end. If the access token proves to be invalid or doesn’t have the required permissions, API Gateway will deny the request. I will cover this part in the next post.
3. Steps to set up the Cognito side
Bob quickly set up a proof-of-concept in Cognito to receive the access token he wants to use for authorization.
To do it, he followed the steps described below. The screenshots are from the old Cognito console.
3.1. Create a User Pool
We need a User Pool first. We don’t need any users because we will create access tokens for service-to-service communication. We can accept the default settings here.

In this example, the User Pool is called s2s-test.
All settings below will belong to the User Pool we created in this step.
3.2. Create an App client
The App client will call Cognito on behalf of the microservice which wants to make the authorized request to the other microservice.
We have to create an App client in Cognito. We give it a name (in this example, sts-test-app-client) and accept the default settings. We must keep the Generate client secret box checked because we’ll need to specify it in the request for the access token.

The default token expiration is one hour, and we can modify it if we want to.
We will need the App client id and App client secret strings later. When the calling service wants to generate an access token, it will provide the App client IDs to Cognito. This way, Cognito will know that the service behind the App client is legit, and it can safely return the token.

We can have more than one App client for a User Pool. We can create different apps for different platforms or services, for example.
3.3. Domain name
We will need a URL we can invoke to get the access token.
Let’s go to the Domain name section, and create a Cognito domain. The calling service will invoke the https://<DOMAIN_NAME>/oauth2/token URL with the App client ID and secret we created in 3.2.
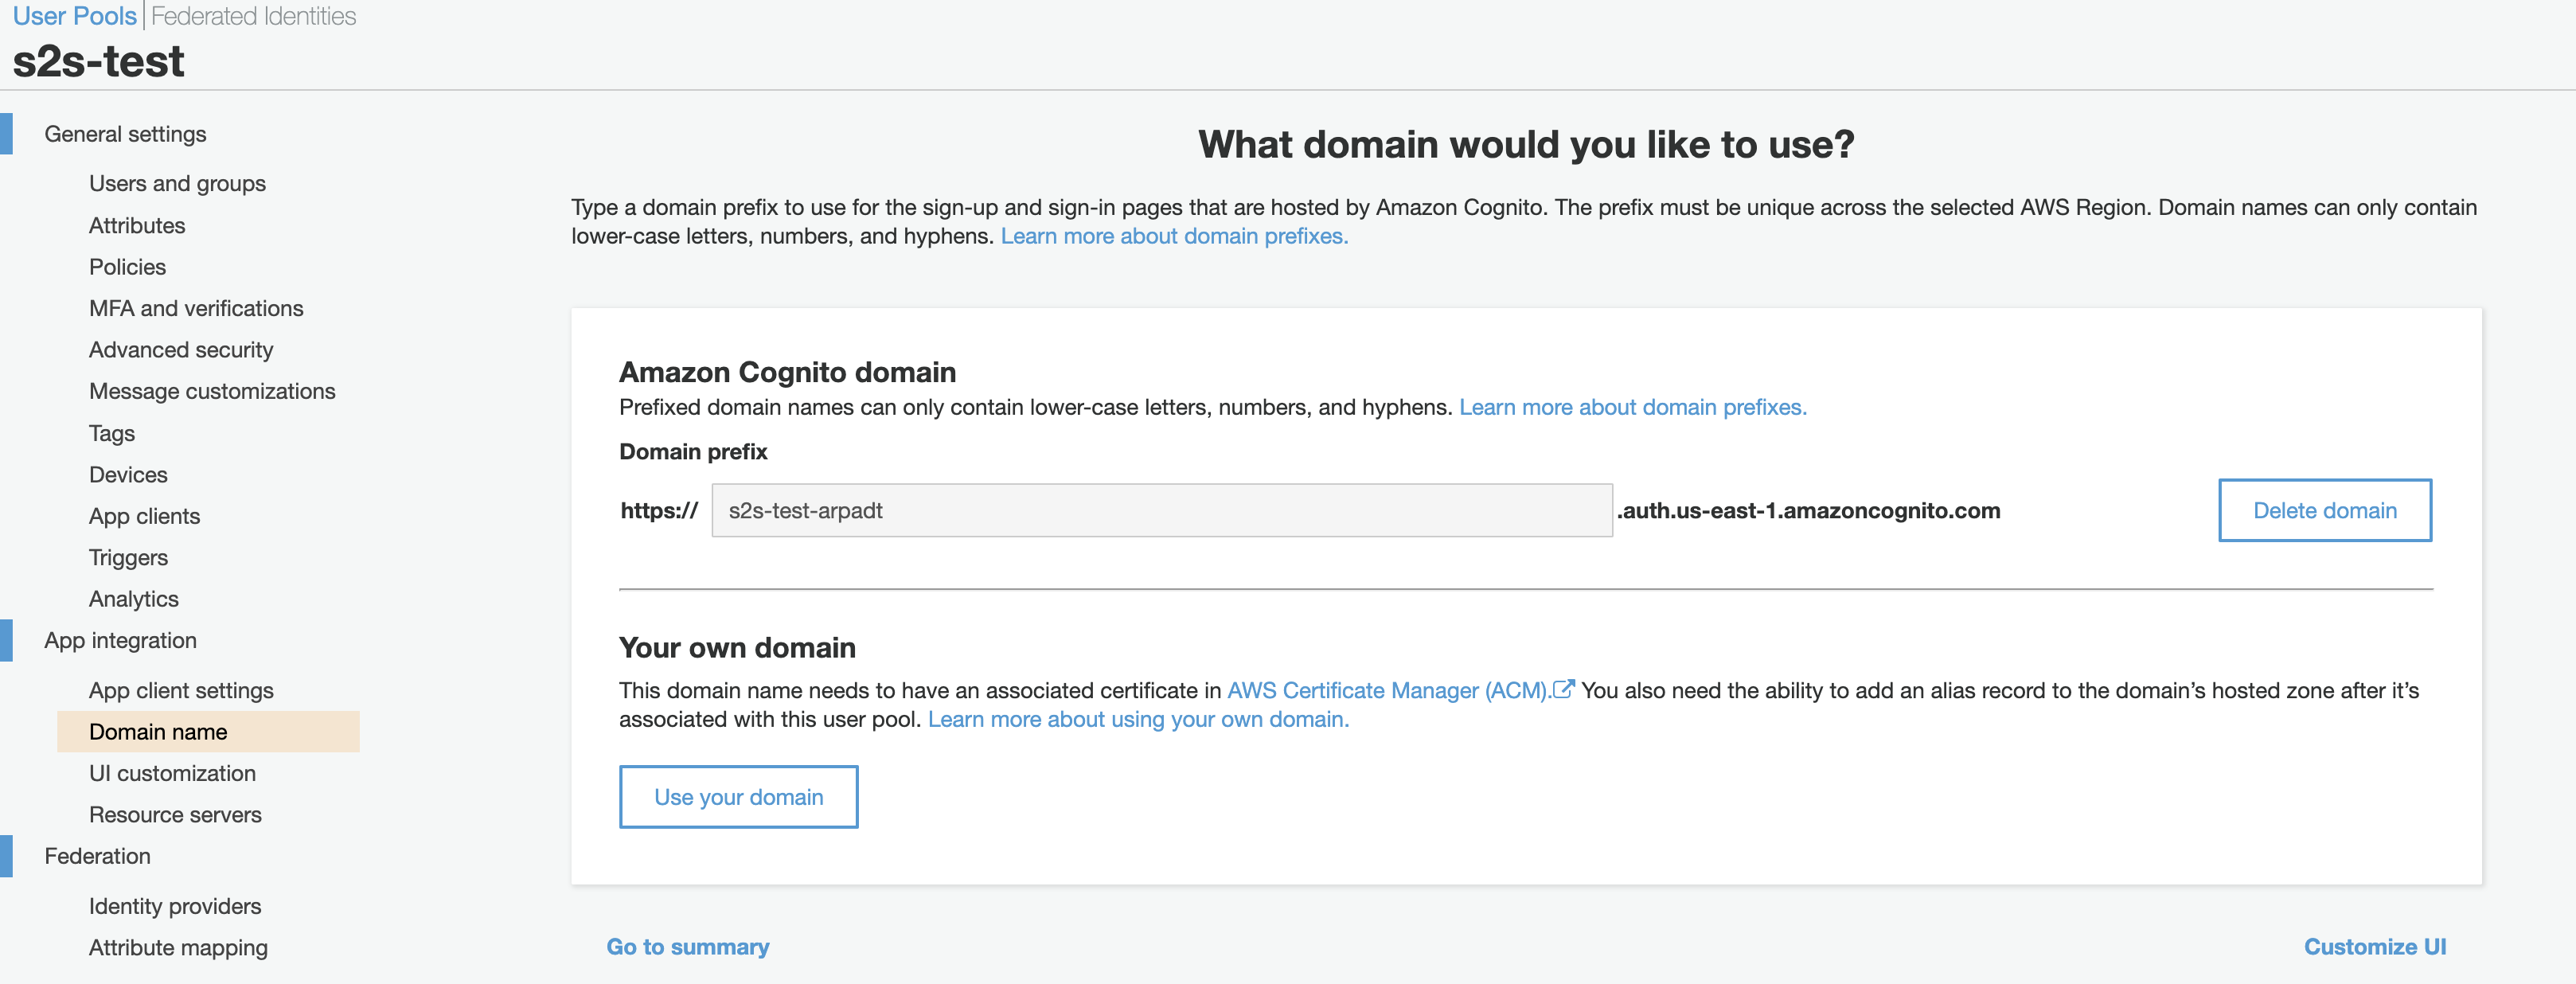
We can have our own domain too, which we must configure in Route 53. Custom domains also require a public certificate, which we can get free from ACM.
3.4. Resource server and custom scopes
Next, we will set up the custom scopes in the Resource servers section.
Scopes are permissions. We can use these scopes to ensure fine-grained access control to other services.

First, we create a resource server called Test API here. Let’s name the scope Identifier demo. Then we will define the custom scopes: read.file and write.file. The final format of the scope strings will be RESOURCE_SERVER_IDENTIFIER/SCOPE_NAME because Cognito will concatenate the resource server name and the scope with a / in between.
3.5. Set grant type in App client
The last step is to set up the grant type in the App client settings menu.

The grant type should be client_credentials for service-to-service communication, so we want to check the Client credentials box in the Allowed OAuth Flows section. We also want to tick off the boxes next to the custom scopes we have created in the previous step (demo/write.file and demo/read.file).
When we invoke the Cognito domain with the App client credentials, we can request that the custom scopes be in the access token. We can’t have any permissions in the access token that we haven’t listed in the Allowed Custom Scope section. The Cognito API won’t respond with an error if we require a scope that is not allowed. The access token won’t contain that permission instead.
4. Action time
We are now ready to create the access token!
I’ll use Postman to make the token request for now.
4.1. POST request
The TOKEN Cognito endpoint only accepts POST requests. As I mentioned above, we will need to call the https://<COGNITO_DOMAIN>/oauth2/token endpoint.
4.2. Headers
We must pass the App client ID and secret in a Base64-encoded format to the Authorization header. Luckily, Postman automatically sets it up for us.

We should also specify the Content-Type header, whose value must be application/x-www-form-urlencoded. Postman also has this header built-in.
4.3. Body
The body must contain the grant_type property, which should have the client_credentials value for service-to-service authorization.

We can specify which scopes (permissions) we want to have in the access token. The scope will only be there if we have previously enabled it in the App client (3.5).
4.4. Access token
We can now hit the Send button, and we should receive an object with access_token, expires_in, and token_type properties.
The access token is a JWT. If we inspect the token, we will see the required (and allowed) scopes there. The called service will validate if the required scopes are in the token.
5. Summary
We can use the client_credentials grant type to generate access tokens for service-to-service communication. The calling service will receive it from Cognito upon submitting a request to the TOKEN endpoint. The called microservice will then validate the token with Cognito.
Part 2 will cover how Bob can validate the token in the other service.
6. References and further learning
OAuth 2.0 - Learn more about OAuth 2.0
Using the access token - Everything about Cognito access tokens
TOKEN endpoint - The endpoint which will return the access token