Deploying an Express application to AWS ECS in Fargate mode
Part 1 of the ECS post series briefly discussed Elastic Container Service in general, while in Part 2, we deployed a very simple Express server to AWS ECS using the EC2 launch type.
Let’s see how the same application can be deployed in Fargate mode.
1. What is Fargate?
Fargate is a compute engine for ECS. If the containers are launched in Fargate mode, AWS will take over the responsibility of managing the underlying hardware.
In practice, we don’t have to worry about choosing the right EC2 size for the application and managing the server, because AWS will do this all for us.
2. Advantages of Fargate
The first advantage has already been mentioned: AWS takes the responsibility of provisioning and managing the underlying servers off of our shoulders. This is great!
In case the underlying server is down, Fargate will get rid of it, and a new one will be launched with our containers, so no monitoring is needed.
But it’s not all about servers going down. If our application consists of many containers and instances, managing all of them will take time, and time is money. With Fargate, this is done for us.
We don’t have to worry about scaling the infrastructure either. Fargate will launch additional containers if needed. All we have to do is to specify the image, and CPU and the memory, and the rest is managed by Fargate.
If you have ever launched an application to ECS in EC2 mode (for example, by following the tutorial in Part 2), you have seen that we have to do quite a bit of work with setting up the cluster.
We can’t avoid creating a cluster here either, but the hassle is much less, as it can be seen from the demo below.
Overall, Fargate fits the serverless concept of AWS, which is apparently the future for deploying applications (or not; time will tell).
3. Disadvantages
Like everything, Fargate has its disadvantages.
The fully managed infrastructure means that we don’t have control over the servers on which the containers run. With Fargate, we are not able to use docker exec anymore, because we won’t have access to the underlying container instance.
Sometimes we might want to see what’s going on inside a container, so if you are sort of a control freak, Fargate might not be the best choice.
Also, when the container is defined, we have no options to do port mapping. The host port cannot be defined, so the application will be available on the container port (unless a load balancer is placed before the service, but this is out of the scope of this post).
4. Demo - deploying the application
Let’s see how the application is deployed in Fargate mode. We’ll use the same application we used in Part 2). I’ll assume that the Docker image is already uploaded in ECR.
I won’t go into details about Task Definitions, clusters and services. If you are not familiar with these terms, please read this post, or follow the above links to AWS to learn more.
4.1. Create the Task Definition
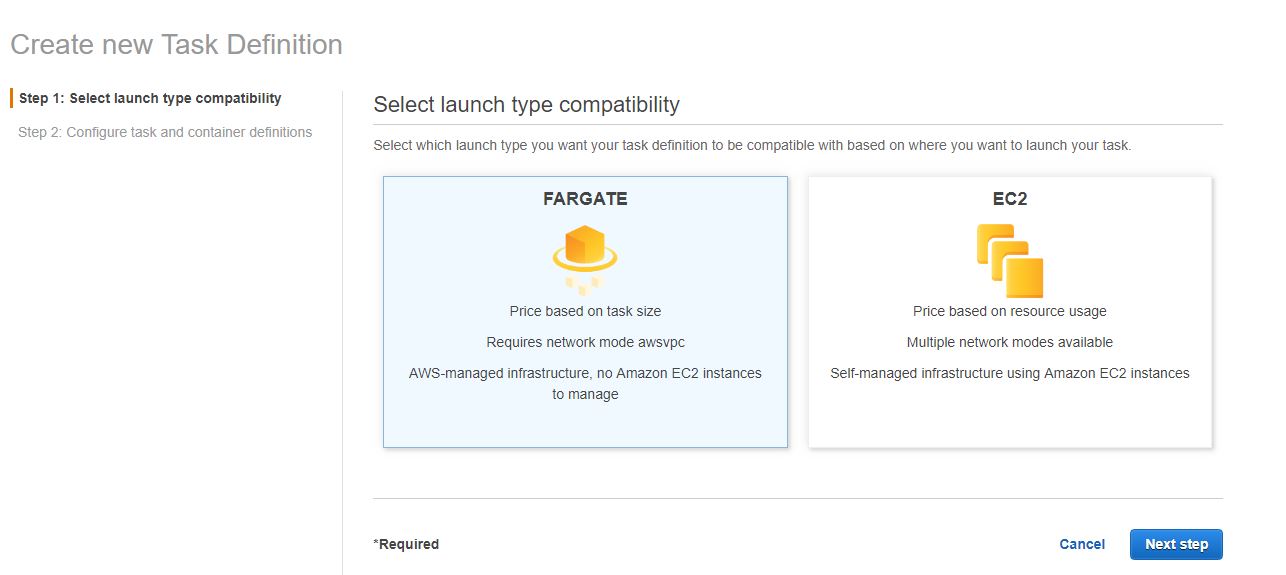
First, we need to create a Task Definition. This time, we’ll choose Fargate launch type:
After clicking Next, we give a name to the task definition, and we’ll see that the network mode field is already populated:
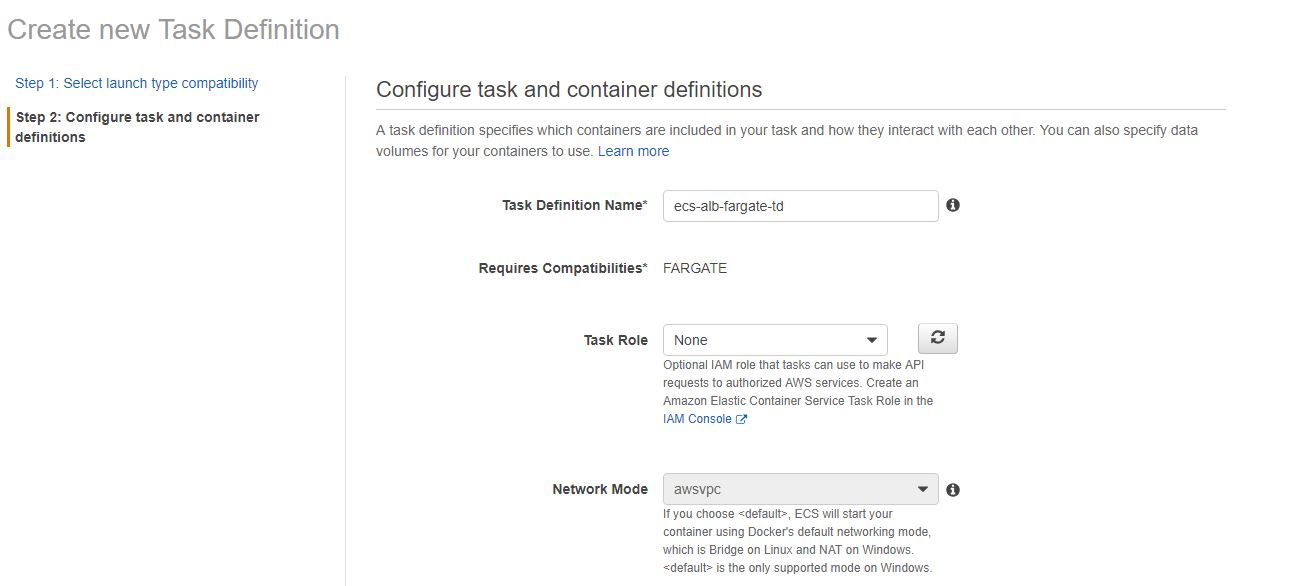
Fargate uses awsvpc network mode, in which the containers get their own primary private IP address and their own internal DNS hostname. This will make the communication of the containers with each other and other AWS services easier. The elastic network interface is managed by AWS, and it cannot be manually deleted.
Next, we have to select a Task Execution Role, which gives permissions to ECS to pull images and place logs to CloudWatch. If you launched the same app in EC2 mode last time, the role is already there, if not, choose Create new role here.
We need to specify the Task memory and Task CPU for Fargate. It’s recommended that the absolute value of the memory be at least twice as the size of the CPU:

The last thing we have to do is to define the container. This is exactly the same as in Part 2, where the same app was deployed in EC2 mode. The only exception which has already been mentioned is that we can only define the container port (3000), because the host port is not valid when the network mode for the Task Definition is awsvpc (which it is with Fargate).
Note that some other features are not supported either, like Links and Hostname in awsvpc network mode, but we won’t need them for this demo.
Click Add and then Create. The Task Definition should be created!
4.2. Cluster
Next, we have to create the cluster. This will be easy as it’s fully managed by AWS.
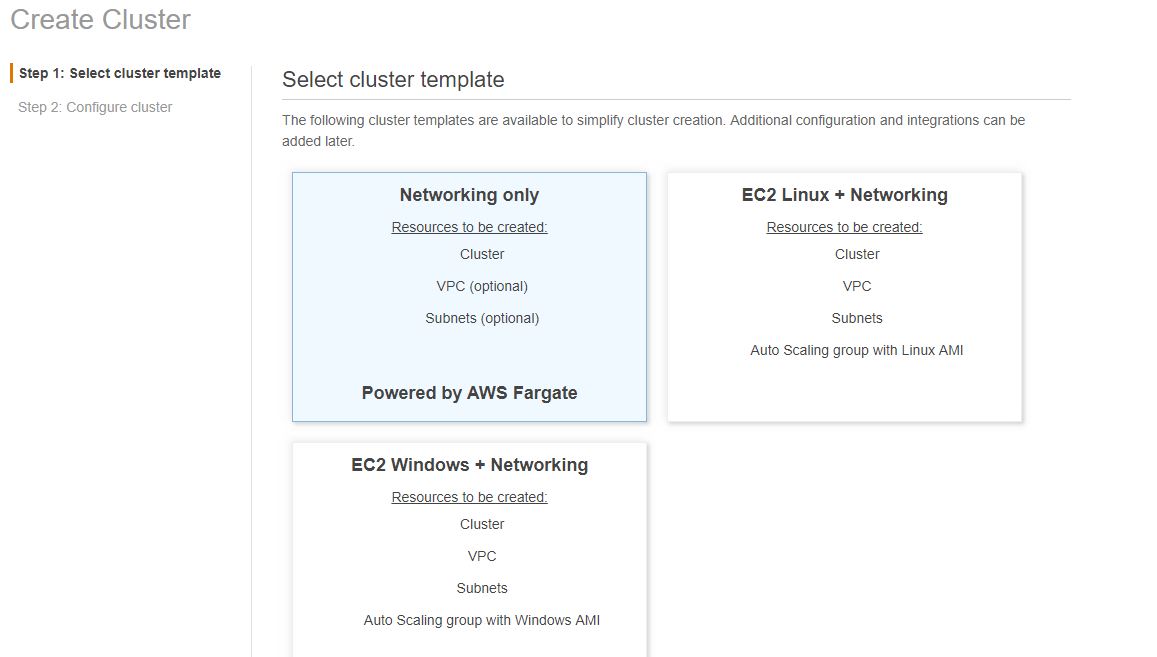
Go to the Clusters in the left menu, and select Networking only. This will advise AWS that we wish to use Fargate:
Then we have to give a name to the cluster, and select the Create VPC checkbox. The step is optional; we can place the cluster in the default VPC, which is automatically created in each region when the AWS account is set up:
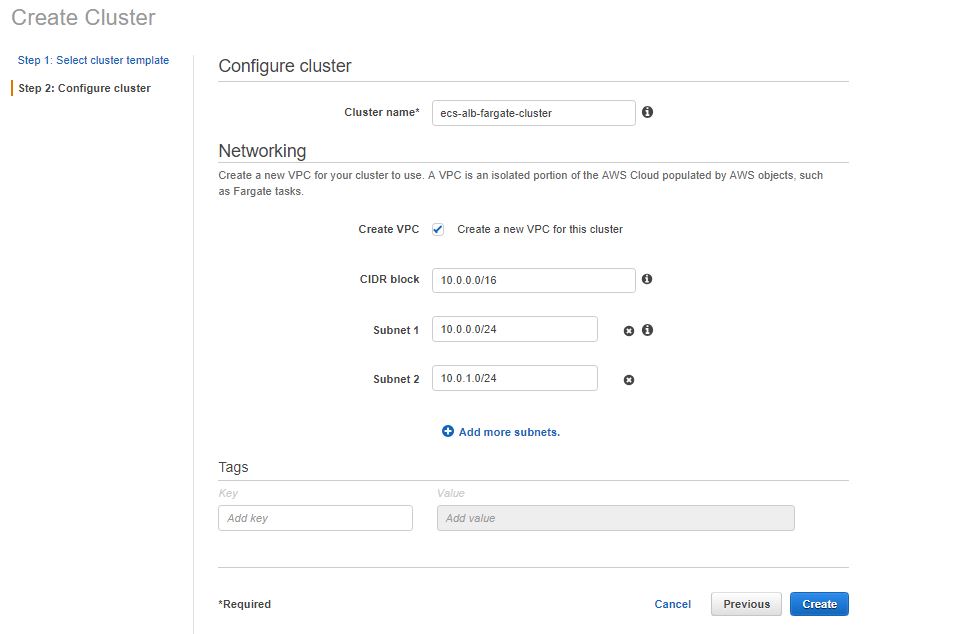
Press Create, and that’s it! This was easy!
4.3. Service
The last step is to create the service.
In the Clusters page, the Services tab comes first, and we need to click of Create.
For the launch type, select FARGATE, then give a name to the service. We need to select the Task Definition and the cluster from the dropdown, here choose the ones that were created above.
Add the number of tasks (which is 1 in this case):
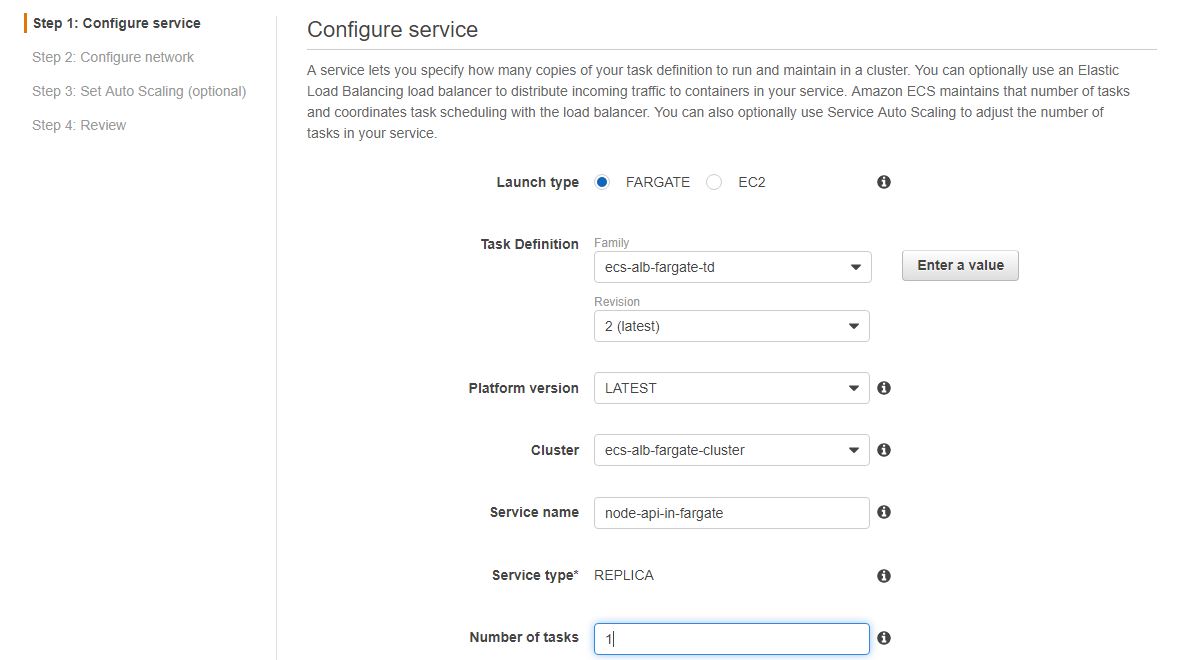
The service type is REPLICA, which means that the tasks will be evenly distributed across the cluster (this won’t be hard with us launching just one task).
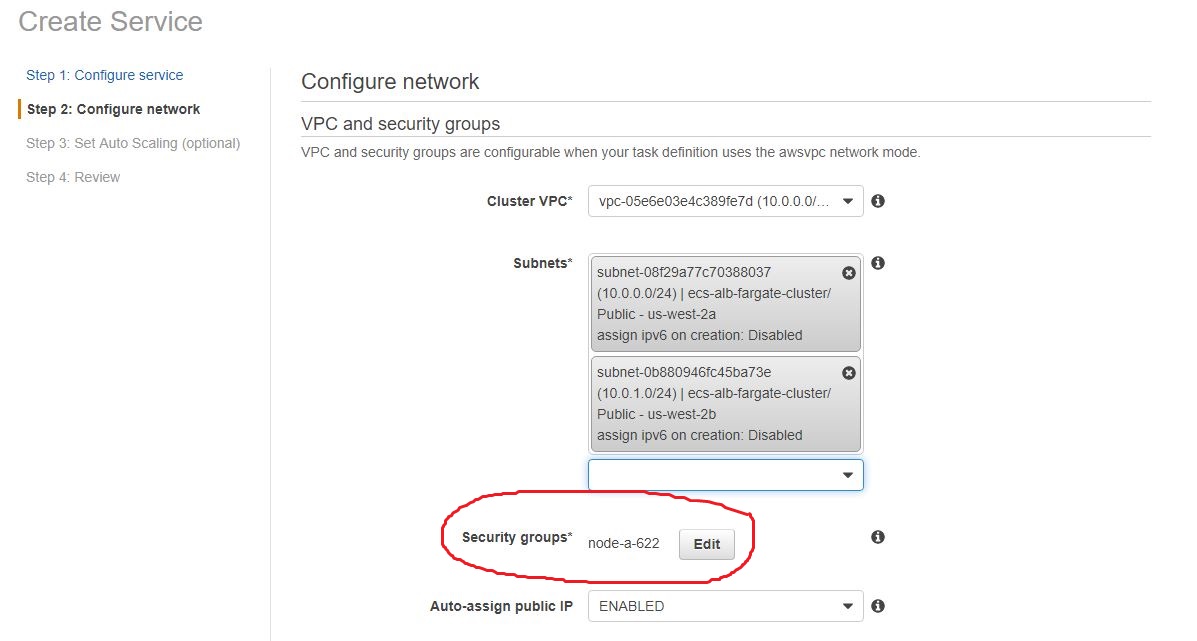
On the next page, select the VPC which was created in the cluster section. We also need to select the subnets where the tasks need to be run.
The next step is very important.
By default, the inbound rules of the security group related to the application allows incoming traffic on port 80. This means that our application won’t be accessible, because the port the server is running on is 3000. Any request to port 3000 will time out.
We have to update the security group to let traffic come in to the container on port 3000. To do that, click on Edit next to Security groups:
On the security group pop-up, let ECS create a new security group. We can give it a more expressive name and description (optional), and then click on Add rule. From the dropdown on the left, select Custom TCP, set the port to 3000, and the source is Anywhere 0.0.0.0/0. We don’t need the default port 80 setting, and it’s safe to delete it with the little cross next to it.
Ideally, the new security group looks like this:
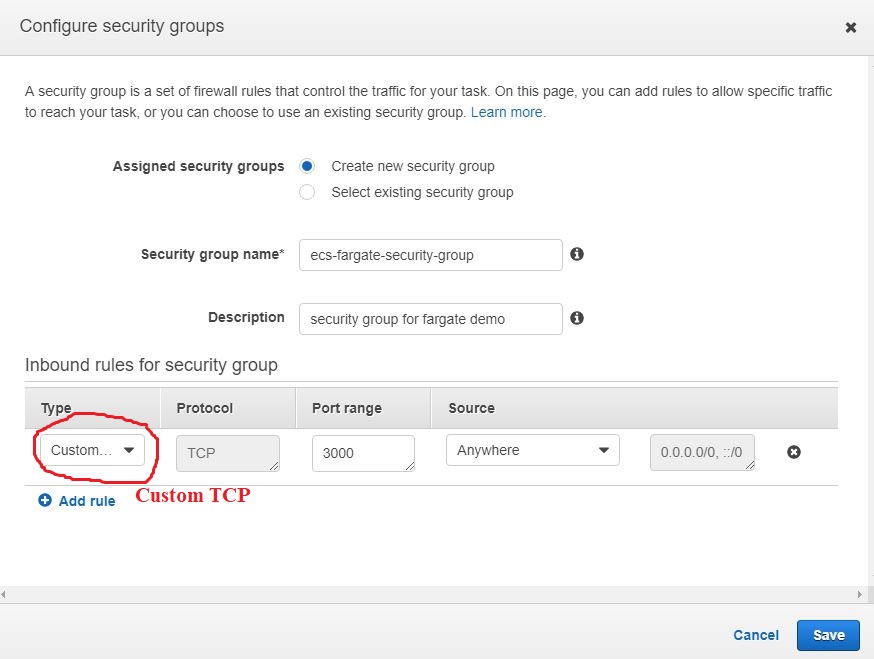
Click on Save, and scroll down to the next section.
We don’t want load balancers this time, and untick service discovery box, because we don’t want to create a private namespace.
The third page is about the auto scaling group settings, leave the default option, and click Next.
We can review what we have done, and then click Create. The service goes to PROVISIONING, then PENDING state, and after a few seconds/minutes is should change to RUNNING, which means that the service has been created.
4.4. Check the application
It’s time to check our application.
Click on the running task, and find the Network section in the middle of the page (there are no accessible EC2 instances in Fargate mode).
There should be a Public IP along with a private IP address and other data.
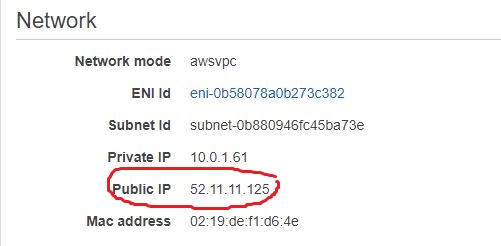
Copy this address and paste it in the browser with :3000 at the end, or do curl PUBLIC_IP_ADDRESS:3000 in the terminal. You should see something like this:
{
  message: 'Home page'
}
Let’s go to the orders page by typing PUBLIC_IP_ADDRESS:3000/orders in the address bar (or do curl PUBLIC_IP_ADDRESS:3000/orders in the terminal), and we’ll should receive the bunch of fruit:
{
  orders: [
    'apple', 'banana', 'lemon'
  ]
}
It’s working!
5. Clean up
To avoid getting charged, we’ll need to clean up.
Go to Clusters, delete the service, and then delete the cluster itself.
In the Task Definitions section, click on the task definition, check the box next to the Task Definition, and choose Deregister from the Actions dropdown.
6. Conclusion
Fargate launch type in ECS is a fully managed container service, where we don’t have to worry about provisioning, patching and managing the underlying servers.
The trade-off is that we have less control over the containers, and the networking between containers also happens differently.
Fargate fits well AWS’s serverless concept, and allows developers to focus on the containers instead of the infrastructure.
Thanks for reading, and see you next time.